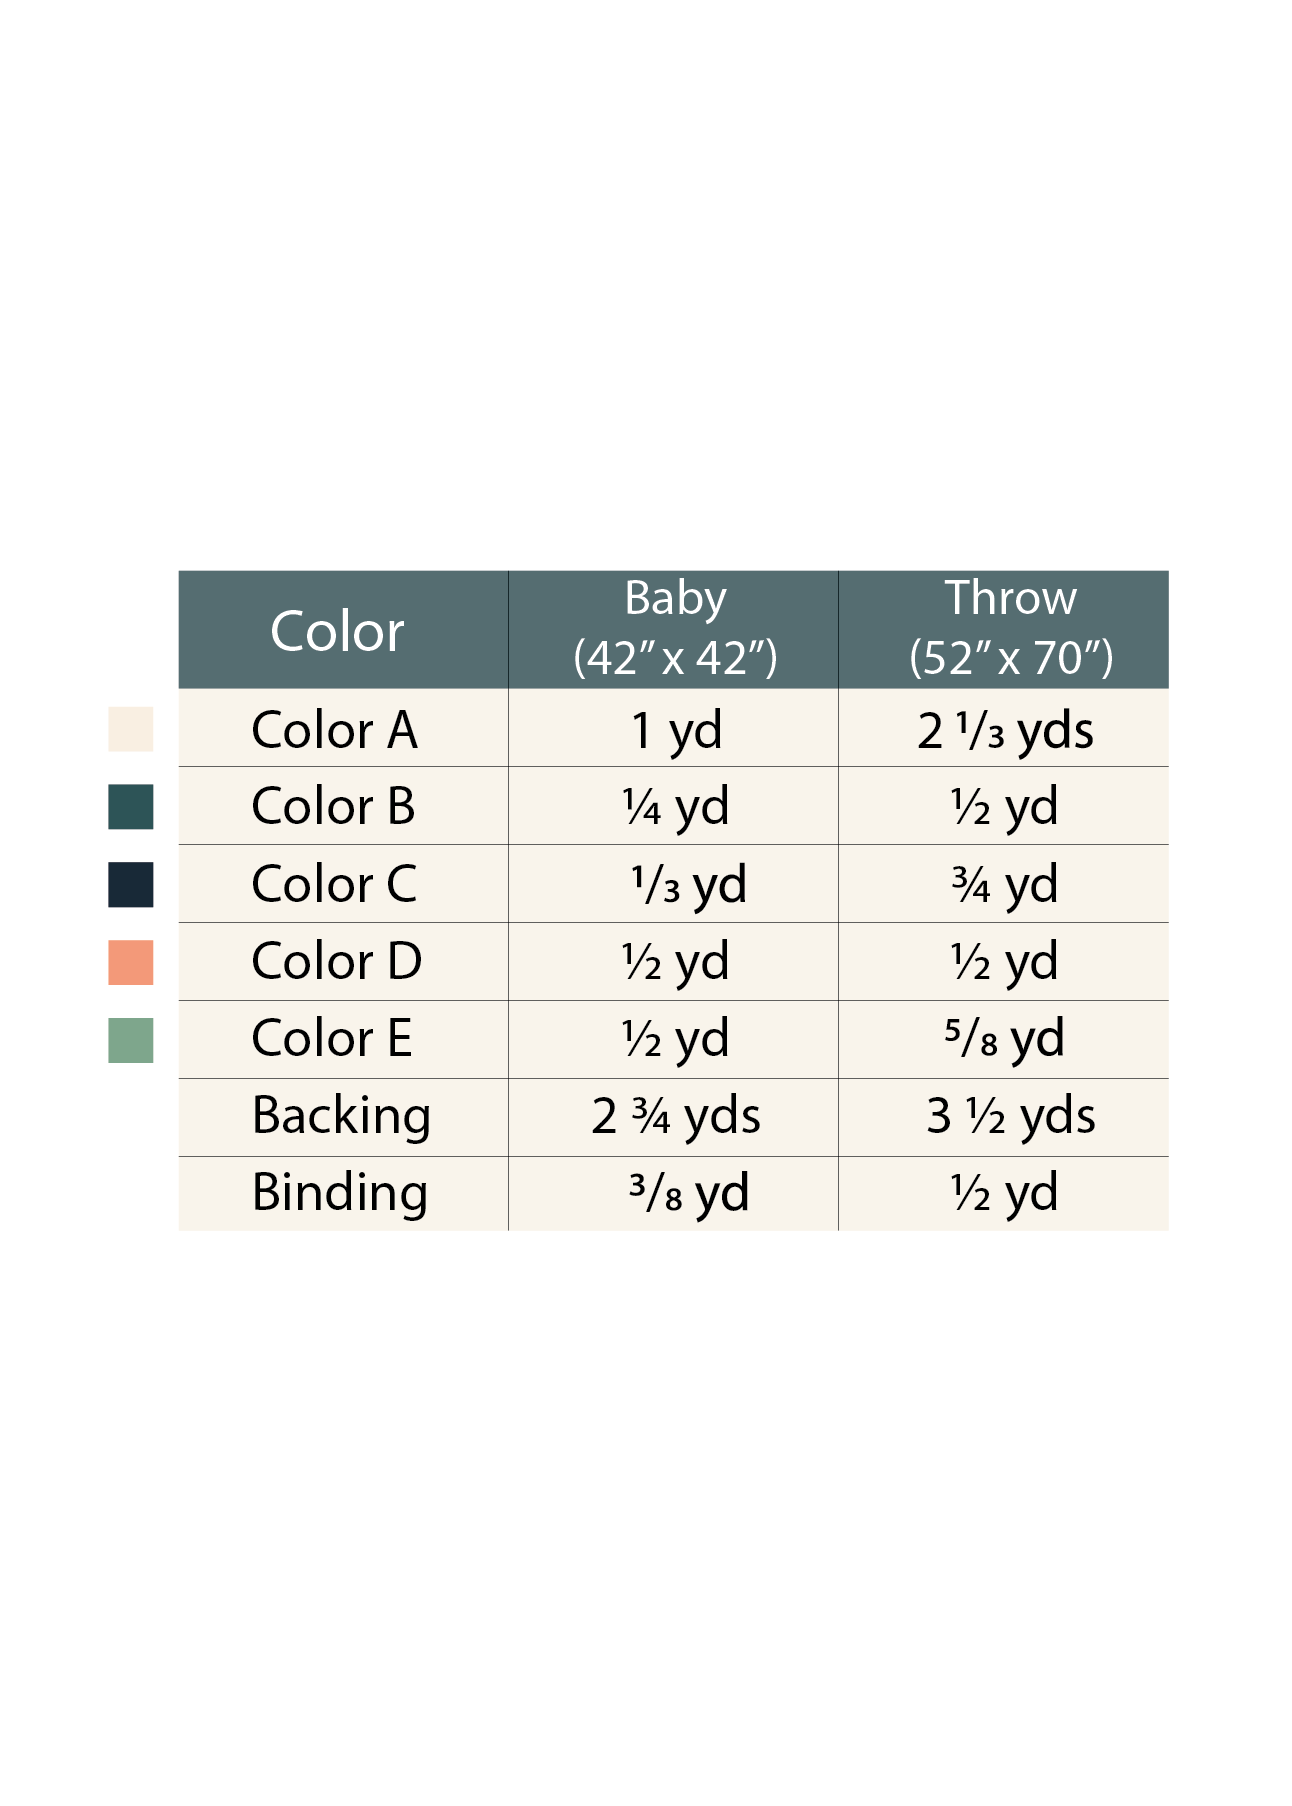
Beginner Quilting Tools I Swear By (and What You Don’t Actually Need Right Away)
Starting your quilting journey can feel overwhelming — especially when it seems like you need a dozen specialty rulers, a drawer full of gadgets, and an overflowing closet of "stash fabric" just to begin. When I started Coronado Quilt Co. my quilting space was a little corner in the dining room of our 700 sqft apartment. I had to learn what was necessary and what was not to create a functional mini studio.
The truth is: you don’t need a room full of tools to make beautiful quilts. I’m a firm believer in having fewer tools — but making sure they’re high quality and built to last.
Some of the tools I use are on the pricier side, but I’ve learned that investing in good tools from the start saves time, frustration, and even money in the long run. After years of quilting, designing patterns, and teaching others, I’ve figured out exactly which tools are truly essential for beginners — and which ones are nice-to-haves you can add over time. Whether you’re a brand new quilter or just looking to simplify, here’s what I truly swear by in my own sewing room.
🧵 My Must-Have Beginner Quilting Tools
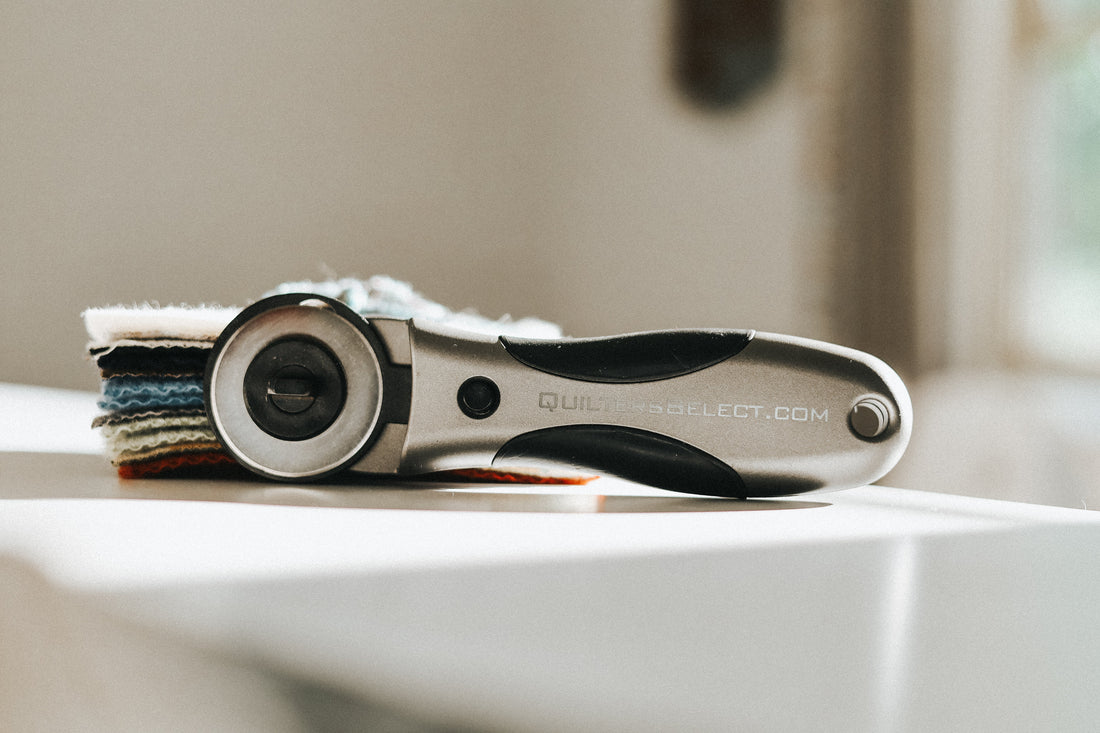
1. A Good Quality Rotary Cutter
This is your workhorse. You’ll use it for nearly every project, so invest in one that feels good in your hand and cuts smoothly. I prefer models with ergonomic handles and safety locks. Keep extra blades on hand — a fresh blade makes a world of difference! My favorite rotary cutter is made by Quilters Select. I love the locking safety mechanism and I love that it's heavy and feels sturdy in my hands. You can use any 45mm blades for this rotary cutter, but I have found that the Quilters Select blades stay sharper longer so I feel they are a better value.

2. Two Rulers: 6.5”x24” and 6”x6”
These two sizes will carry you through almost every cutting task. The long ruler is ideal for cutting strips and squaring fabric, while the square ruler is perfect for trimming blocks. Are other rulers fun? Sure. Are they necessary? Not at first. I have zero specialty rulers in my studio and prefer to find trimming methods such as trimming Half Rectangle Triangles using my standard rulers. Here is a tutorial to do just that if you have ever struggled with the dreaded HRT (Trimming HRTs Without Tears: A Foolproof Method for Perfect Points)

3. A Large (24”x36”) Cutting Mat
Give yourself as much space as you can. A large self-healing mat means fewer adjustments and more accurate cuts. Trust me — a bigger mat will save your back, your fabric, and your sanity.
Currently I have the Fiskers cutting Mat and I like it okay, but I really want the Quilters Select mat. I like that it has the numbers going both directions. I can't tell you how often that feature would come in handy. But for now I just reorient my fabric or count the inches on the mat... so fun.. Haha I have linked both below so you can decide what works for you!

4. A Walking Foot
This is a game-changer when it comes time to quilt your project. A walking foot helps feed the layers of your quilt sandwich evenly through your machine, preventing shifting and puckering. You will have to find the walking foot that is compatible with your machine, but that can be done with a quick google search. Once you have a walking foot, the world is your oyster for quilting! I love the techniques Jacquie Gering teaches in her books Walk and Walk 2.0.

5. An Iron You Trust
Crisp seams make crisp blocks. You don’t need anything fancy — just a solid, reliable iron that gets nice and hot. I personally LOVE my Panasonic cordless iron. I love that I can maneuver the iron over my seams without having a cord to get in the way. Some people don't like that the iron cools down if you are using it a lot without docking it in between. But honestly I have been using mine for the past 4 years and have never had a problem. It is a little on the pricier side so if you are looking for a budget friendly option, any iron will do! I just highly recommend an auto shutoff feature because us quilters can be easily sidetracked... haha
Panasonic 360 Freestyle Cordless Iron
✨ Nice-to-Haves (But Not Must-Haves)
Once you’ve got the basics down and you’re feeling ready to invest in a few extras, here are the tools that have earned a permanent spot in my sewing room:
• Wool Pressing Mat
This holds heat beautifully and makes your seams lie super flat. It's one of those things you don’t know you’re missing until you try it.
• Tailor’s Clapper
Pair it with your iron and wool mat for ultra-crisp seams — especially helpful for bulky points or nested seams. I am so lucky to have a woodworking dad who made me a custom clapper for my birthday using one of my designs. Unfortunately I did all I could to convince him to sell them and he won't budge. But I've linked a great clapper that will get the job done!

If you are looking for a more decorative clapper, I know that Modern American Vintage makes beautiful wood quilting tools.
• Clips
Many people use pins, but I have found clips are perfect for binding, bulky seams, or quilted projects like pillows and bags. My favorite clips are these Sohmo metal clips. They can be hard to find in the states as they are an Australian company, but some places do carry them. I often times carry them in my shop, so be on the lookout! I linked Clover Wonder Clips below as a good alternative.

Final Thoughts
If you’re working with limited space or a limited budget (been there), know this: you can absolutely make gorgeous quilts with just a handful of well-chosen tools.
Over the years, I’ve found that having fewer, better tools not only makes the process more enjoyable — it makes it more sustainable. You don’t need every new ruler or gadget on the market. Just a few high-quality, reliable basics that make your work easier and your results better.
You don’t need a fully stocked studio to start quilting — just the confidence to make that first cut. 💛